Okay, let’s talk iced espresso. If you’ve ever taken a sip of a good one, you know the vibe: It’s like the perfect balance of coffee strength and cool refreshment all in one. Whether you’re gearing up for a busy day or just want to kick back, an iced espresso is exactly what you need. The thing is, it’s not just about throwing some espresso over ice and hoping for the best—this little drink needs some care.

But don’t worry—I’m here to guide you through it, step-by-step. It’s not rocket science. It’s just coffee, ice, and a little bit of patience. So let’s dive in!
Step 1: Pick the Right Beans
Alright, first things first—beans. I can’t stress this enough. The beans are the heart of your iced espresso. If you want that rich, bold flavor that punches through the ice, go for a medium to dark roast. Light roasts can be a little too… well, light. You need a roast that’s got some depth to it, something that won’t get lost when it’s chilled down.

Here’s what I’ve learned from personal experience: chocolatey, nutty, or caramel notes work wonders. They add a little sweetness naturally without needing to dump a bunch of sugar in later. You don’t need to go crazy—just pick a roast that you actually like to drink, because if you don’t enjoy the flavor, no amount of ice will save it.
Step 2: Fresh Ground Beans (Because You’re Worth It)
I know it’s tempting to use pre-ground coffee, but seriously, fresh is best. The difference is like night and day. Grinding your own beans means you get to enjoy the freshest, most flavorful espresso. You want to grind your beans fine, like sugar. Not powdery, but fine enough to create a strong, concentrated shot of espresso.
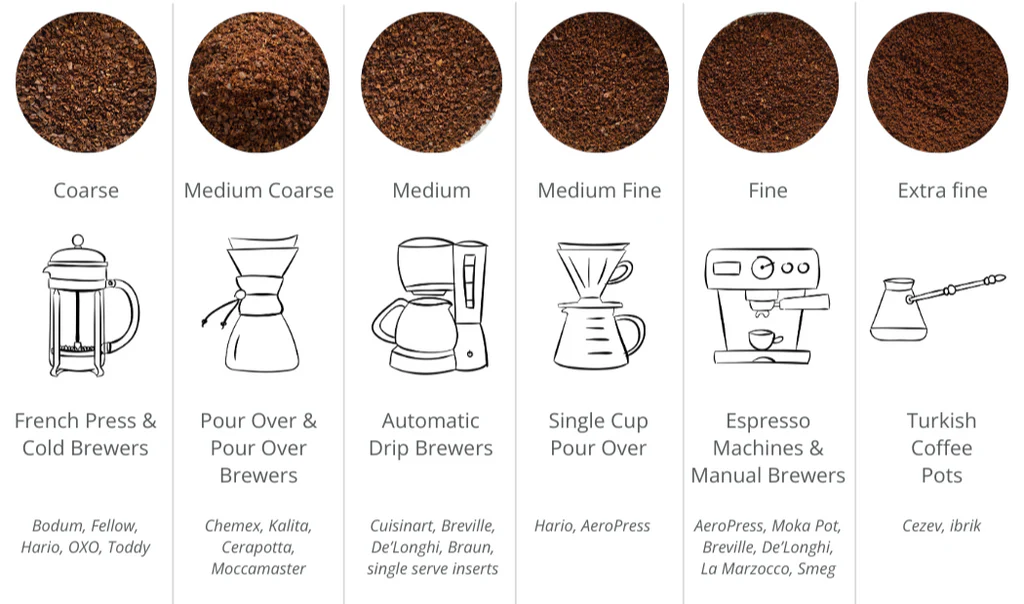
Now, I’m not saying you need to get all fancy with a burr grinder (but if you have one, you’re living the dream). A basic blade grinder works fine, just pulse it to get a consistent grind.
Step 3: Brew That Espresso Like a Pro
Alright, time to brew. If you’ve got an espresso machine, lucky you! You’re going to pull a single shot (that’s about 1 ounce of espresso). If you’re more of a stovetop kind of person, a Moka pot works beautifully for this. Honestly, whatever method you use, just make sure it’s concentrated. You want that espresso to pack a punch, because when it hits the ice, it needs to hold its ground.

A quick note: Don’t pour hot espresso directly over ice. Trust me, you’ll regret it. Hot espresso + ice = watered-down mess. Let it cool off for a minute or two on the counter before you go pouring it over your ice cubes. It makes a huge difference, and your taste buds will thank you.
Step 4: Ice, Ice, Baby
Now let’s talk ice. This is where people go wrong all the time. Don’t use those tiny, crushed cubes—you’re just asking for your espresso to get watered down faster than you can say “coffee.” Use big, solid cubes. You want your ice to melt slowly so it can keep your drink cold without diluting that delicious flavor. If you’re feeling extra fancy, you can even freeze some leftover espresso into ice cubes. That way, your iced espresso just gets stronger as it melts.

It’s like the coffee keeps giving back. Smart.
Step 5: Pour It Like You Mean It
Now, the moment you’ve been waiting for. Pour your espresso over the ice, but don’t just rush through it. Take your time. Watch that dark, rich espresso swirl over the ice cubes, mixing slowly. There’s something almost magical about it. When you see it happening, you know you’re about to enjoy something seriously special.

If you’re feeling like a caffeine overachiever, go ahead and brew a double shot. You can’t go wrong with a little extra espresso in your iced coffee, trust me.
Step 6: Sweeten It (If You Want)
I get it—some of us love a little sweetness in our iced espresso. Personally, I’m all about keeping it simple, but I won’t judge if you want to add some sweetener. Simple syrup is your friend here. It blends in easily without any gritty sugar leftover, and you don’t have to worry about it not dissolving properly. You can also get a little wild with some flavored syrups like vanilla or caramel if you’re feeling fancy.

Or, if you’re more of a cream person, add a splash of half-and-half or whole milk. Not too much, though—this is an espresso, not a latte. A tiny bit goes a long way.
Step 7: Stir and Sip Like a Pro
Okay, once you’ve got everything in there, stir it. Just a quick mix to make sure the flavors come together. Then, take a sip. That first sip is always the best. You’ve got that bold espresso flavor, the smooth chill of the ice, and just the right amount of sweetness (if you chose to add it). If you nailed it, you’ll be grinning ear to ear, because let’s face it, you just made an iced espresso that rivals anything you’d get at a cafe. And you didn’t even have to leave the house.
Final Thoughts: The Best Iced Espresso is the One You Make Yourself
Making iced espresso isn’t just about following the steps. It’s about making it your own. Play around with the flavors, the ice, the milk—or even skip it all and go for a black iced espresso. The beauty of it is that you get to customize it to exactly what you want. And nothing feels better than sipping on a drink you crafted with your own two hands.

So, the next time you’re craving that perfect iced espresso, don’t just hit the coffee shop. Make your own. You’ve got this.
